
Whether you want to protect your expensive lens, bring out extra detail in the sky, or shoot that special ‘trick’ shot, filters are much more than a fancy piece of glass
Thanks to Instagram we’re all using filters these days, but that piece of glass you put in front of your lens does much more than any software-based filter ever could. Filters come in all shapes and sizes but round or square, big or small, they all affect how your camera sees the world.
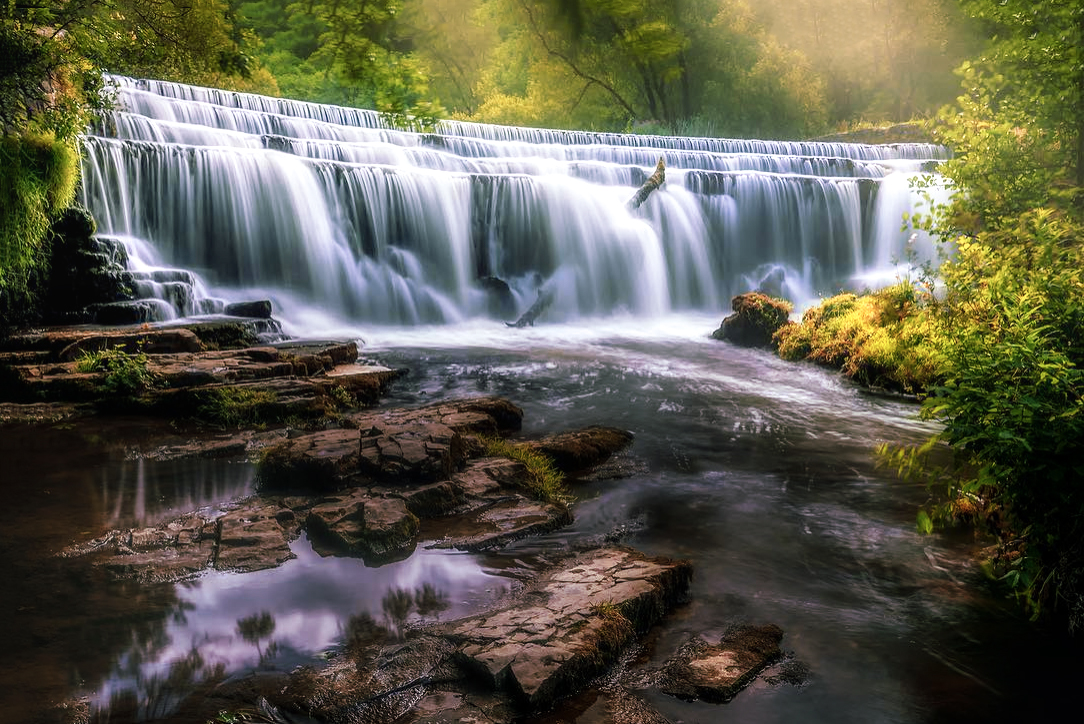
There are some shots that are impossible without a filter. The silky water shot above, by Phil Norton, is one of those. For more of Phil’s images, take a look at philnortonphoto on Instagram.
Five reasons you need a filter
1. PROTECTION: While it might seem anathema to put a (relatively) inexpensive piece of glass in front of all those costly optics you’ve just forked out for, it only takes one careless moment to leave an indelible scratch on every shot thereafter. That’s what a UV (or sunlight) filter is for, and it’s the reason these are the most common filters. As well as protecting your lens, a UV filter also filters out some ultraviolet light, reducing haze. Pre-dating digital, a skylight filter is the same thing but has a very subtle pink cast to it.
2. DRAMATIC SKIES AND FEWER REFLECTIONS: If you shoot landscapes, you’ll be interested in using a circular polarising filter. Working in much the same way as polarising sunglasses, they’re ideal for shooting blue skies because they raise the contrast and make clouds stand out more. The shot at the start of this blog, by Carmine Savarese, shows when a circular polariser comes in handy. They also work really well when you want to get rid of reflections in glass and water, with the effect at its best when you shoot at right angles to your light source. It’s called a circular polariser because as you rotate the filter, it changes the intensity of the effect.
3. LONG EXPOSURE: If you yearn to create long exposure shots, you won’t get far without an ND (neutral density) filter. This is the filter photographers turn to when they’re trying to create silky water or ethereal-looking waterfalls. Like sunglasses, they darken the scene your camera sees, meaning the shutter can stay open for longer. With a little know-how (and a sturdy tripod) you can make some magical compositions. They’re also handy for portraits taken in bright conditions, because you can widen the F-stop when it might normally be too bright to do so.
Filters range from ND4 all the way up to ND1000. Crucially, the good ones do not affect colours in any way – hence ‘neutral’ density. An ND8 increases your exposure time by about three stops. An ND8 or ND16 is probably a good place to start. At the darker end, an ND1000 reduces light by a massive 10 stops – but why would you want it so dark? Stick your camera on a tripod, point it at a busy tourist attraction and press the shutter, and you’ll see why. With such a long exposure time, everything that moves (ie the people) virtually disappears.
4. PERFECT SUNSETS: As well as ND filters, there are graduated ND filters for difficult lighting situations such as sunrises and bright skies on a grey, gloomy day. Mostly used for landscapes, they dull down the sky so you can expose for the foreground. They’re used less often these days because with digital you can take several shots of the same scene, varying the shutter time, then use software to combine the correctly-exposed bits of each shot. Graduated filters come in hard grads and soft grads, denoting how quickly the tint changes to clear.
5. SPECIAL EFFECTS: Software might be able to perform miracles but for those that prefer to avoid post-processing, there’s a wealth of filters that can perform special tricks. Try some of these: tinted filters (graduated or not) are popular for correcting colour issues; a star filter turns pinpoints of light into stars; soft focus replaces the old photographers’ trick of smearing Vaseline on the lens; and a split field filter has glass on only one half, enabling you to focus on two areas at the same time.
Round or square?
Filters come in two styles: round, with a threaded rim that screws directly onto your lens; and square, where the filter is a piece of glass that slides into a holder attached to the lens. In both cases you can put one filter in front of another (and another).

If you intend to use your filter with lenses of different sizes, or you want to use graduated filters, you may find a square filter more appropriate. Square filters make it quicker and easier to try out options and for graduations you can move the filter to get the tint exactly where you need it. As one of the most established players in the market, Cokin’s 85mm and 100mm square filters have become industry standards. The wider you shoot, the bigger the filter you’ll need.

In an upcoming blog, we’ll look in more depth. In the meantime, if you’ve taken a long exposure shot you’re proud of, then we want to see it. Upload your favourite long-exposures to Instagram and tag with #jessopsmoment. We’ll showcase some of the best on our Facebook page.
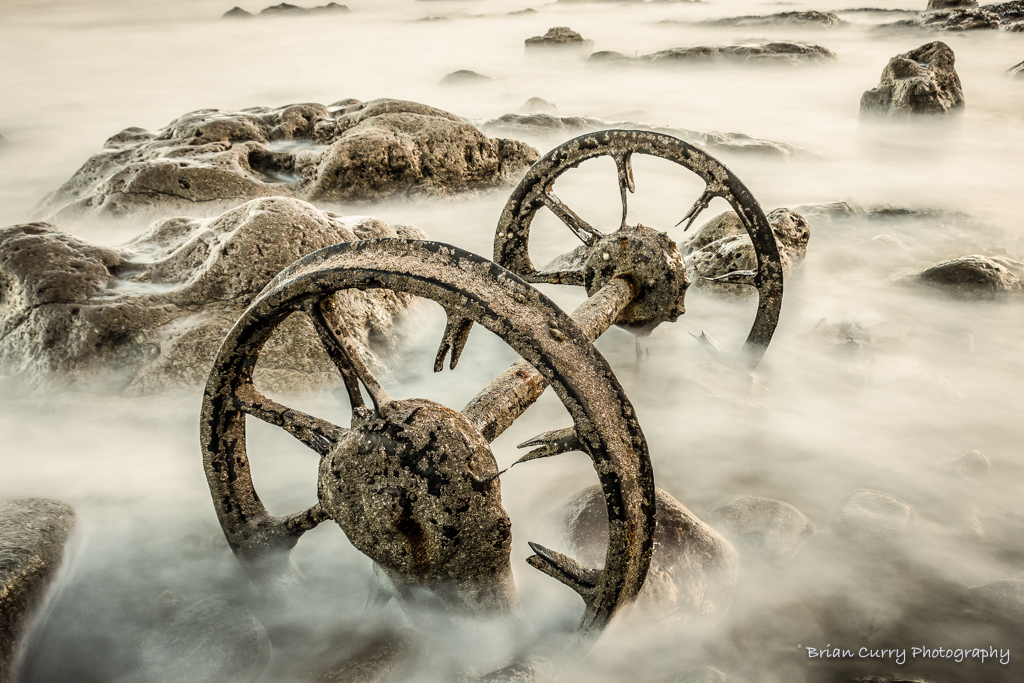
Waves are perfect for long-exposure shots. As Brian Curry’s shot illustrates, as you vary your exposure time you can achieve different water effects. Check out Brian’s photos on Instagram, @brian.curry.
Sign up for our latest news and offers
Receive the best offers right to your inbox by signing up to our newsletter
Thank You
