
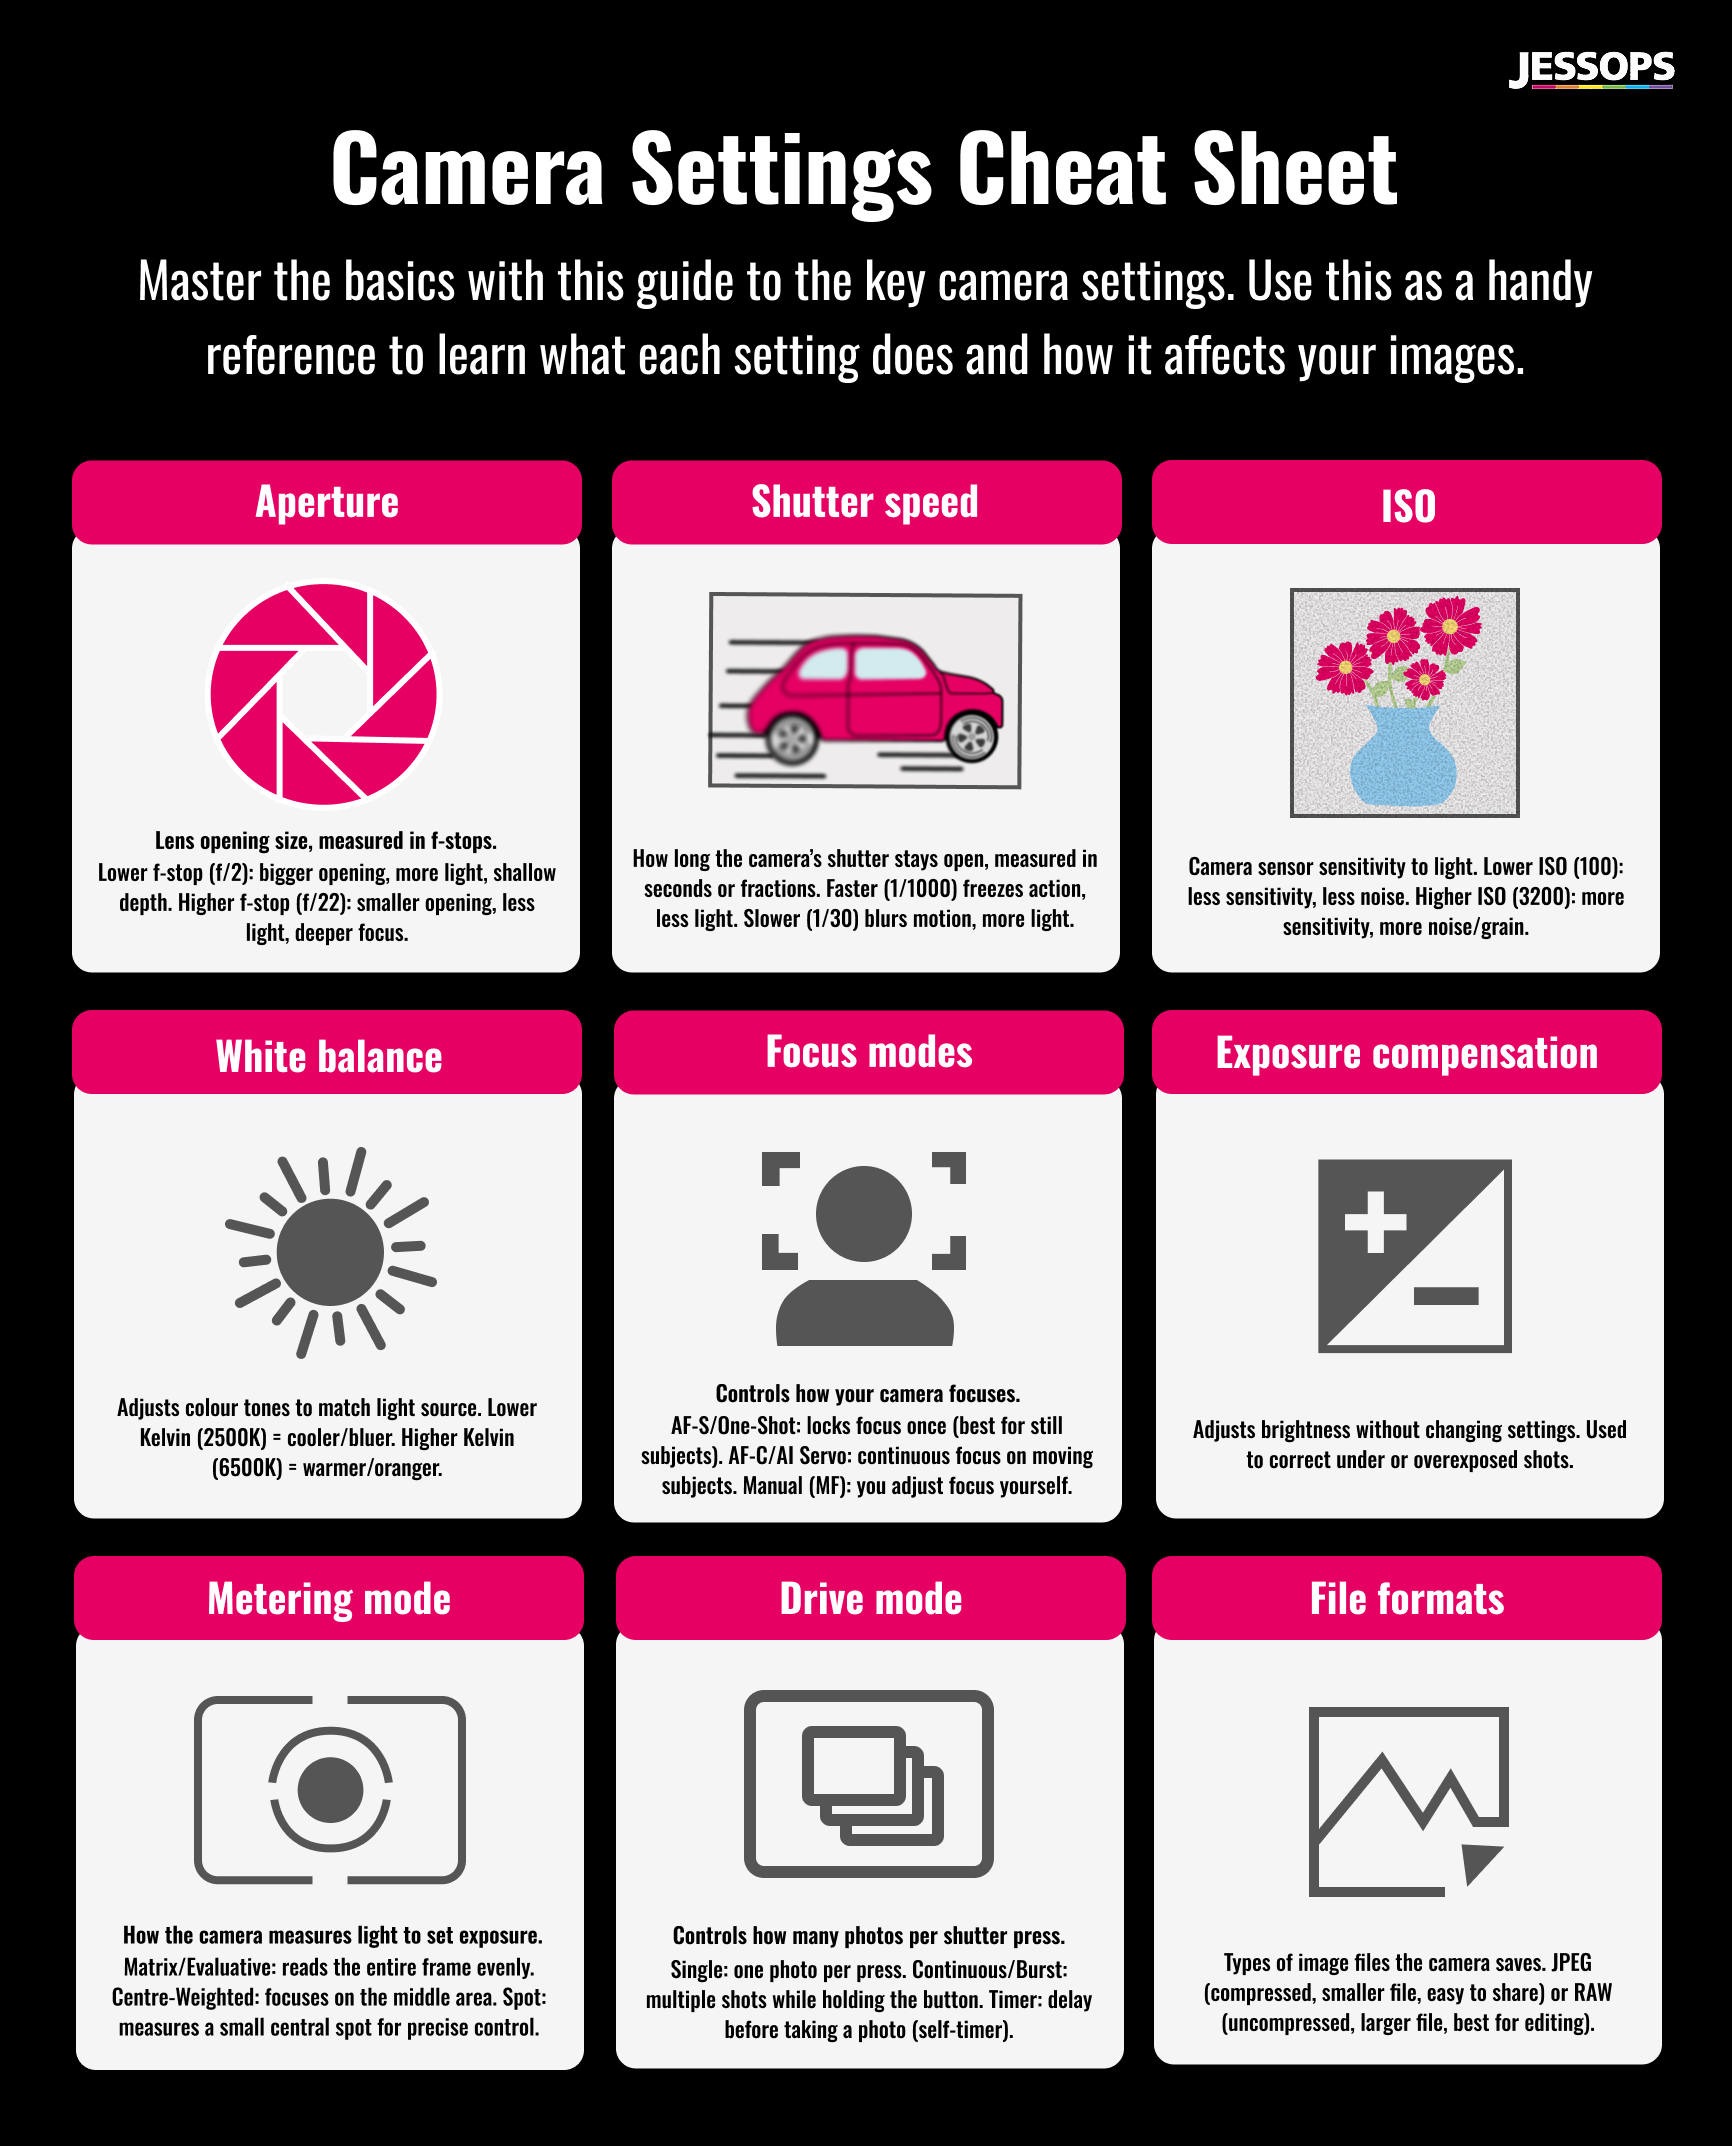
Camera settings explained:
A beginner’s guide

If you’ve just got a new camera or you’re ready to take the plunge, it’s time to make the most of it. Understanding camera settings might seem overwhelming at first, with terms like aperture, shutter speed, and ISO flying around. But mastering these basics and switching from auto to manual settings is the key to taking photos that truly capture your vision.
Whether you’re just starting out or looking to improve your skills, this guide will be your handy reference. With help from Lizzie James, Product Specialist at Jessops, we’ll explain the essential camera settings and how to use them across different camera brands. We’ll also answer frequently asked questions to help you take better photos every time.
Plus, we have a handy camera settings cheat sheet, so you can quickly find and understand each setting as you practice and explore your camera.
Contents
What are the camera mode settings?
Different camera types and what settings you can adjust
What are the 3 basic camera settings?
How to use the exposure triangle
What are the camera mode settings?
Camera mode settings control how much input you have over things like aperture, shutter speed, and ISO — and they’re usually selected using the mode dial on top of your camera. Understanding what each mode does can help you choose the right one for the shot you want to take.
Lizzie says: “You don’t always need to shoot in full manual mode to get great results. Many photographers — even professionals — use semi-automatic or priority modes, like Program (P) mode, for example, to strike a balance between creative control and ease of use. These modes can be incredibly useful in everyday shooting situations, especially when light conditions are changing or you want to focus on just one aspect of your settings.”

Here’s a quick breakdown of the most common camera modes:
Auto (A or green icon) — The camera takes full control of all settings. Great for beginners or quick, no-fuss shots.
Program (P) — The camera chooses shutter speed and aperture, but you can still adjust things like ISO and white balance.
Aperture Priority (A or Av) — You choose the aperture, and the camera adjusts the shutter speed to match. Ideal for controlling depth of field — perfect for portraits or close-ups.
Shutter Priority (S or Tv) — You set the shutter speed, and the camera handles the aperture. Great for freezing fast motion or adding motion blur for creative shots.
Manual (M) — You control everything — shutter speed, aperture, and ISO. Best when you want full creative control or consistent results across multiple shots.
Different camera types and what settings you can adjust
The type of camera you use can make a big difference to the settings you can control. Here’s a quick rundown of the most common camera types and what you can expect to adjust on each one:
Compact cameras
Compact digital cameras are built for ease of use. Most of the key settings — like aperture, shutter speed and ISO — are handled automatically, so you can focus on composing your shot.
Some compact camera models do allow limited adjustments, such as ISO or white balance, but manual control is generally quite restricted. That’s exactly what makes them a great choice for beginners — you don’t need to learn all the technical settings straight away. Just point, shoot, and let the camera do the hard work.
Looking for a new point-and-shoot camera? Read our Compact Camera Buying Guide.

Mirrorless cameras
Mirrorless cameras are a step up if you’re ready to take more control over your photos. They’re similar to DSLRs in what they can do, but without the extra weight — so you get more creative control and manual settings like aperture, shutter speed, ISO and white balance, just in a smaller, lighter body.
You can swap out lenses depending on what you're shooting, and there's plenty of flexibility to customise how you use the camera. If you’re starting to explore things like long exposures or manual focus, a mirrorless model gives you the freedom to experiment.
Read our Mirrorless Camera Buying Guide to find out more.

DSLR cameras
Digital SLR cameras give you the most hands-on experience. They’re a top choice for photographers who want maximum control over every aspect of their shot. From aperture and shutter speed to ISO, focus modes and metering options, everything is at your fingertips — often via physical dials and buttons that let you make quick adjustments while you shoot.
DSLRs are ideal for those who want to master manual settings and get the most out of their photography.

What are the 3 basic camera settings?
Lizzie explains: “When you're getting to grips with manual photography, there are three key settings that form the foundation of every shot — aperture, shutter speed and ISO. Together, they make up what’s known as the exposure triangle and knowing what each of them does and how to adjust them, essentially means you’ll be able to photograph anything.”
“These settings control how much light hits your camera’s sensor and how your final image looks — from how bright it is to how much of the scene is in focus or whether motion appears frozen or blurred.”
“You’ll find and adjust these settings a little differently depending on your camera’s brand or model — especially between compact, mirrorless and DSLR types.” But don’t worry — we’ll walk you through this.
Aperture (f-stop)
“Aperture is the size of the opening in your lens that lets light into the camera,” explains Lizzie. “It’s measured in f-numbers (like f/1.8, f/4, f/16). A wide aperture (like f/1.8) lets in more light and creates a shallow depth of field — that’s how you get that lovely blurred background effect in portraits.”
“A narrow aperture (like f/16) lets in less light but keeps more of the image in focus, which is great for landscapes or group shots.”
“Most compact cameras control aperture automatically, especially in full auto mode. Some advanced models let you change it manually by switching to a mode like Aperture Priority (often labelled as Av or A), but options are usually limited.”
“If you’re using a mirrorless or DSLR camera, you’ll usually adjust aperture by switching to Aperture Priority (Av/A) or Manual (M) on the mode dial. Once you're in the right mode, you'll typically use a physical dial near the shutter button — or sometimes a wheel on the back of the camera — to scroll through different f-numbers.”
Exactly how you do this can vary depending on the brand. Here's a quick guide to help you find the aperture setting on your camera:
| BRAND | MODE | WHERE TO FIND IT | HOW TO ADJUST |
| Canon | Av (Aperture Priority) or M (Manual) | Main control dial (PASM dial) | Use the main dial just under the shutter button or the rear wheel to scroll through the f-numbers |
| Nikon | Av (Aperture Priority) or M (Manual) | Main control dial (PASM dial) | Use the main dial just under the shutter button or the rear wheel to scroll through the f-numbers |
| Sony | Av (Aperture Priority) or M (Manual) | Main control dial (PASM dial) | Use the main dial just under the shutter button or the rear wheel to scroll through the f-numbers |
| Fujifilm | A or M (varies by model) | Control ring on lens or the PASM dial (if the camera has it) | Turn the control ring on the lens, if available. If not, adjust using the main dial |
Shutter speed
 |
 |
|
|
|
Shutter speed is the length of time your camera’s shutter stays open to let light hit the sensor. It’s measured in fractions of a second — like 1/250 or 1/60 — or whole seconds, like 1” or 10”.
A fast shutter speed (e.g. 1/1000) freezes motion, perfect for fast-moving subjects like wildlife or sports. A slow shutter speed (e.g. 1/10 or slower) blurs movement, which can create beautiful effects like smooth waterfalls or light trails.
Most compact cameras control shutter speed automatically. But if you're using a mirrorless or DSLR camera, you’ll usually have access to Shutter Priority (S or Tv) or Manual (M) mode, giving you full control.
Switching to Shutter Priority mode lets you set the shutter speed while your camera automatically adjusts the aperture and ISO (when these settings are in auto mode). In Manual mode, you can control all settings.
Here’s how to control shutter speed with the main camera brands:
| BRAND | MODE | WHERE TO FIND IT | HOW TO ADJUST |
| Canon | Tv (Shutter Priority) | Main control dial (PASM dial) | Use the main dial near the shutter button or the rear wheel to scroll through shutter speeds |
| Nikon | S (Shutter Priority) | Main control dial (PASM dial) | Use the main dial near the shutter button or the rear wheel to scroll through shutter speeds |
| Sony | S (Shutter Priority) | Main control dial (PASM dial) | Use the main dial near the shutter button or the rear wheel to scroll through shutter speeds |
| Fujifilm | S (Shutter Priority) | Shutter speed dial on the top of the camera or the PASM dial (if the camera has it) | Turn the dedicated shutter speed dial or switch to S on the PASM dial, then adjust with the control dial |
Check out our Shutter Speed Guide to learn how different speeds affect your photos — with examples and tips for every scenario.
ISO
Image taken with fast shutter speed to freeze the squirrel’s movement. A mid ISO (1250) was used to brighten the shot in moderate light, as faster shutter speeds let in less light.
ISO controls your camera sensor’s sensitivity to light. A low ISO (like 100 or 200) is less sensitive and works best in daylight, producing clean, sharp images with minimal noise. A high ISO (like 1600 or above) makes the sensor more sensitive, which helps when shooting in low light — but it can also introduce grain or ‘noise’ into your photos.

Lizzie says: “On most compact cameras, ISO is set to automatic, but if you want to change it, you’ll typically find the option hidden in the menu system or a quick settings button. But mirrorless and DSLR cameras often have a dedicated ISO button either on the top or back of the camera body.”
“For some Fujifilm models, there might even be a physical ISO dial on top. Once you press the ISO button or turn the dial, a menu will appear on the screen where you can scroll through different ISO values.”
“In Program (P) mode, you can adjust the ISO while the camera automatically sets the shutter speed and aperture. In Manual mode, you control ISO, shutter speed, and aperture yourself, giving you complete creative control over how your photo is exposed.”
Take a look at our Beginner’s Guide to ISO with tips and examples to help you get the best results in any lighting condition.
| BRAND | MODE | WHERE TO FIND IT | HOW TO ADJUST |
| Canon | Program (P) or M (Manual) | A dedicated button on the top of the camera body or in the quick menu (depending on the camera model) | A menu appears on screen — scroll or tap (if touchscreen) to choose your ISO setting |
| Nikon | Program (P) or M (Manual) | Dedicated button on top of the camera body | A menu appears on screen — scroll or tap (if touchscreen) to choose your ISO setting |
| Sony | Program (P) or M (Manual) | Button on the back of the camera | A menu appears on screen — scroll or tap (if touchscreen) to choose your ISO setting |
| Fujifilm | Program (P) or M (Manual) | ISO dial on the top of the camera, in the quick menu (Q button on the back of the camera) | Turn the ISO dial or press Q, then scroll or tap to select your ISO setting |
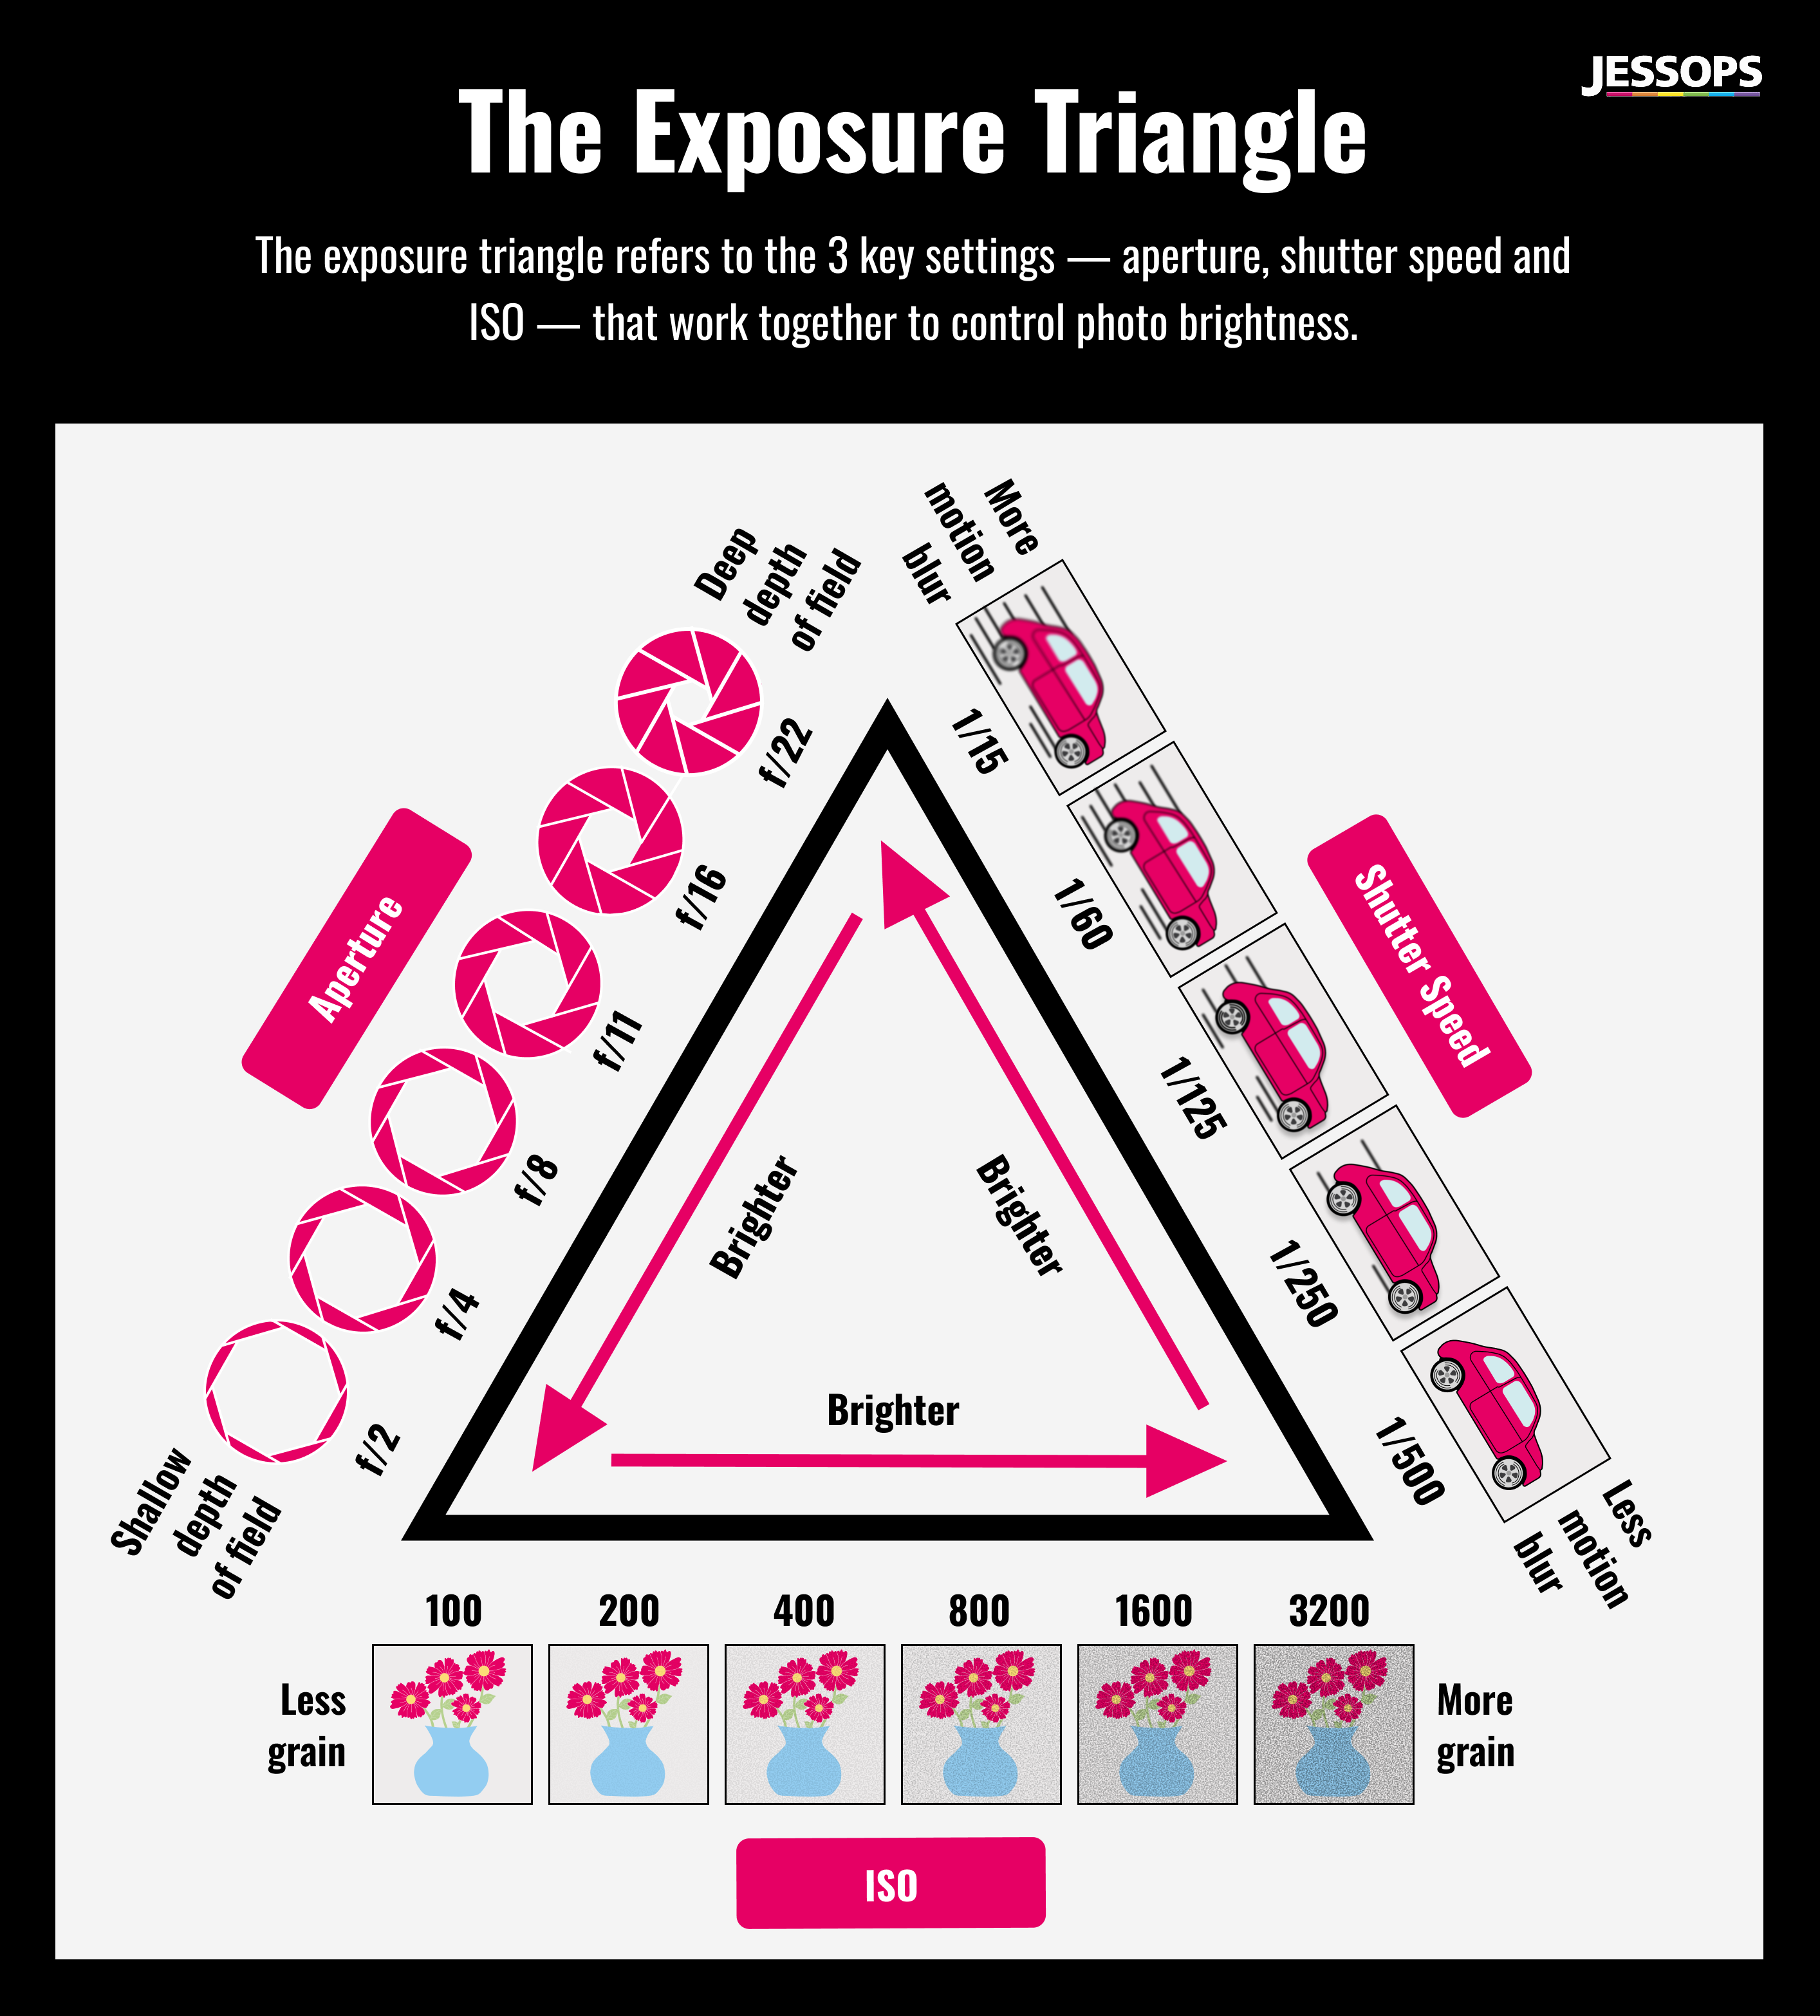
How to use the exposure triangle
The exposure triangle is the balance between shutter speed, aperture, and ISO — the three settings that work together to control the brightness of your image. Adjust one, and you’ll usually need to tweak one or both of the others to maintain the right exposure.
Take car light trails, for example. You’ll want a slow shutter speed to capture that smooth, streaking effect. But because the shutter stays open longer, more light hits the sensor, which could lead to overexposure. To compensate, you’d typically lower the ISO (to reduce sensitivity to light) and/or narrow the aperture (a higher f-number) to let in less light.
Lizzie says: “Getting the exposure balance right takes practice — so don’t worry if it feels a bit tricky at first. Try using your camera’s semi-automatic modes to build confidence. In Aperture Priority mode (Av or A), you choose the aperture, and the camera sets the shutter speed for you if you have it set to Auto. And in Shutter Priority mode (TV or S), you pick the shutter speed, and the camera adjusts the aperture to match. When in Aperture or Shutter Priority mode, you can let the camera handle the other settings by setting them to Auto or take control and adjust them yourself by setting them to Manual."
"In Program mode (P), the camera chooses both shutter speed and aperture, but you still have control over ISO.”
White balance
“White balance controls the colour temperature of your photos — it adjusts how warm or cool your image looks,” explains Lizzie. “Different lighting conditions, like sunlight, shade, or indoor bulbs, can make your photos appear too blue, orange, or green.”
“By setting the correct white balance, your camera ensures that whites actually look white, and all other colours stay natural. Most cameras have automatic white balance (AWB), which works well in many situations. But for more accurate results, especially under tricky lighting, you can select presets like daylight, cloudy, tungsten, or even set a custom white balance.”
On compact cameras, white balance is usually adjusted through the menu or quick settings. On DSLRs and mirrorless cameras, there’s often a dedicated WB button.
| BRAND | MODE | WHERE TO FIND IT | HOW TO ADJUST |
| Canon | Available in all modes | WB button on the back of the camera | Scroll through the options then press OK |
| Nikon | Available in all modes | WB button on the back or top of the camera | Scroll through the options then press OK |
| Sony | Available in all modes | In the quick menu (Fn button on the back of camera) | Scroll through the options then press OK |
| Fujifilm | Available in all modes | In the quick menu (Q button on the back of camera) | Scroll through the options then press OK |
Focus modes
Focus modes determine how your camera focuses on a subject, which is crucial for capturing sharp, clear images. The main types are:
Single autofocus (AF-S or One-Shot AF) — The camera locks focus when you half-press the shutter, ideal for still subjects.
Continuous autofocus (AF-C or AI Servo) — The camera continuously adjusts focus while the shutter button is half-pressed, perfect for moving subjects.
Manual focus (MF) — You adjust focus yourself, useful in tricky lighting or for creative control.
Choosing the right focus mode helps ensure your subject is sharp, whether it’s a stationary portrait or fast-moving action.
On compact cameras, focus modes are often set automatically. On DSLR and mirrorless cameras, you usually switch focus modes with a dedicated button or a switch on the lens, and can also select modes via the camera menu or touchscreen.
| BRAND | MODE | WHERE TO FIND IT | HOW TO ADJUST |
| Canon | Available in all modes | In the quick menu (Q button on the back of the camera) | Scroll through the options then press OK |
| Nikon | Available in all modes | In the quick menu (Q button on the back of the camera) | Scroll through the options then press OK |
| Sony | Available in all modes | In the quick menu (Fn button on the back of the camera) | Scroll through the options then press OK |
| Fujifilm | Available in all modes | A switch on the front of the camera or in the quick menu (Q button on back of camera) | Click the switch to the focus setting you want or use the menu button and scroll until you find the focus options |
Exposure compensation
Exposure compensation lets you manually adjust your camera’s exposure to make your photos brighter or darker than the automatic settings suggest. It’s useful when your camera’s metering might be fooled by tricky lighting, like bright snow or backlit scenes.
On compact cameras, exposure compensation is usually adjusted via a dedicated button or within the quick menu. On mirrorless and DSLR cameras, you often use a dedicated +/- dial or button, sometimes combined with turning a control dial, to increase or decrease exposure quickly.
| BRAND | MODE | WHERE TO FIND IT | HOW TO ADJUST |
| Canon | Available in all modes apart from Manual | +/- button on the back or top of the camera | Tap the button and scroll through until you find the setting you want |
| Nikon | Available in all modes apart from Manual | +/- button on the back or top of the camera | Tap the button and scroll through until you find the setting you want |
| Sony | Available in all modes apart from Manual | +/- button on the back or top of the camera or a dedication dial on the top of the camera | Tap the button and scroll through until you find the setting you want or turn the dial |
| Fujifilm | Available in all modes apart from Manual | Dedicated dial on the top of the camera | Turn the dial to the setting you want |
Metering mode
Metering mode determines how your camera measures the light in a scene to calculate the correct exposure. It affects which parts of the frame the camera uses to decide how bright or dark the photo should be. Choosing the right metering mode is important because it helps avoid underexposed or overexposed shots, especially in tricky lighting conditions like backlit scenes or high contrast.
Most cameras offer several metering modes such as matrix/evaluative (measures the whole scene), centre-weighted (focuses on the middle), and spot (measures a small area). Selecting the best mode for your scene helps ensure your subject is properly exposed.
On compact cameras, metering mode is usually automatic and rarely adjustable. On mirrorless and DSLR cameras, you can easily change metering mode using a dedicated button, dial, or quick menu.
| BRAND | MODE | WHERE TO FIND IT | HOW TO ADJUST |
| Canon | Available in all modes | Button on the back or top of the camera (the icon looks like a window or a dot in a box with a circle) | Click the button and then select which mode you want from the menu |
| Nikon | Available in all modes | Button on the back or top of the camera (the icon looks like a window) | Click the button then select which mode you want from the menu |
| Sony | Available in all modes | In the quick menu (Fn button on back of camera) | Click the button then select which mode you want from the menu |
| Fujifilm | Available in all modes | Dedicated dial on the top of the camera (usually a secondary dial under another one) | Turn the dial until you get to the mode you want |
Drive mode
Drive mode controls how many photos your camera takes when you press the shutter button. It includes options like single shot, continuous burst (multiple shots in quick succession), self-timer, and sometimes bracketed exposures (several shots at different brightness levels to help you get the perfect exposure).
Lizzie explains: “Use continuous burst mode to capture fast-moving subjects like sports or wildlife — it increases your chances of getting the perfect shot. For group photos or selfies, try the self-timer to avoid camera shake and give yourself time to get in position. Don’t forget to switch back to single-shot mode when you’re done, so you don’t fill your memory card with extra photos.”
On compact cameras, drive mode is usually found in the menu or quick settings and may be limited to single-shot or self-timer. On mirrorless and DSLR cameras, you get more options and quicker access via dedicated buttons or dials.
| BRAND | MODE | WHERE TO FIND IT | HOW TO ADJUST |
| Canon | Available in all modes | Button on back of camera (an icon of squares or clock or both | Scroll down until you find the drive mode you want and select OK |
| Nikon | Available in all modes | Button on back of camera (an icon of squares or clock or both) | Scroll down until you find the drive mode you want and select OK |
| Sony | Available in all modes | Button on back of camera (an icon of squares or clock or both) | Scroll down until you find the drive mode you want and select OK |
| Fujifilm | Available in all modes | Dedicated dial on the top of the camera or a button on the back labelled DRIVE | Turn the dial until you get to the mode you want or select the button and scroll through the menu |
File formats (JPEG vs. RAW)
File format determines how your camera saves images. There are two main types: JPEG and RAW, and Lizzie explains the difference: “Whether you should use JPEG or RAW really depends on what you plan to do with your images. RAW is best if you want the flexibility to heavily edit your photos or if you’re unsure how the shots will turn out. Because RAW files capture more information, you can make significant adjustments to exposure, shadows, highlights, and more during post-processing. On the other hand, JPEG is great if you prefer minimal editing or just want to make slight tweaks quickly.”
“Keep in mind, RAW files are much larger than JPEGs, so they take up more space on your memory cards and storage devices like hard drives or cloud services — that’s an important factor to consider.”
“A good compromise is to shoot in both RAW and JPEG simultaneously. It takes up more storage, but you get the best of both worlds: an easy-to-share JPEG for quick use and the detailed RAW file for when you want to make extensive edits later.”
It’s useful to know that only certain camera models support shooting in RAW format. Generally, DSLRs and mirrorless cameras almost always offer RAW shooting. However, not all compact cameras do — usually only higher-end include RAW support. Entry-level or basic compacts typically shoot only in JPEG.
If RAW shooting is important to you, it’s best to check the specifications of the specific camera model before buying.
| BRAND | MODE | WHERE TO FIND IT | HOW TO ADJUST |
| Canon | Available in all modes | Main menu or quick menu | Select the menu button, then scroll through until you find image format/size and then pick the one you want |
| Nikon | Available in all modes | Main menu or quick menu | Select the menu button, then scroll through until you find image format/size, and then pick the one you want |
| Sony | Available in all modes | Main menu or quick menu | Select the menu button then scroll through until you find image format/size, and then pick the one you want |
| Fujifilm | Available in all modes | Main menu or quick menu | Select the menu button, then scroll through until you find image format/size, and then pick the one you want |
Frequently asked questions
Do you need to use manual mode?
Lizzie says: “Manual mode definitely gives you more control over your settings, but it can be tricky and takes more effort — especially for beginners. There are those who will tell you that unless you shoot in manual mode, you’re not a ‘proper’ photographer. But if you’ve just moved up to a fully-fledged camera from a smartphone, the idea of mastering f-stops, shutter speed, and ISO settings might feel overwhelming. But it’s worth learning for creative control.”
“That said, full manual mode means you set aperture, shutter speed, and ISO all yourself, which isn’t always necessary. Luckily, there are two partial-automatic modes — Aperture Priority and Shutter Priority — that give you plenty of control without needing to manage everything at once. In fact, many seasoned pros rely almost exclusively on these modes. So don’t feel pressured to use manual all the time; advanced auto modes do a great job in most situations.”
How do I set my camera for low-light conditions?
“When shooting in low light, which camera setting you adjust first really depends on the situation and what you want to capture,” says Lizzie. “Different scenes call for different priorities within the exposure triangle — aperture, shutter speed, and ISO.”
“For example, an indoor portrait where your subject is mostly still and you want a beautifully blurred background, start by opening your aperture wide (like f/1.8 or f/2.0). This lets in plenty of light and creates a shallow depth of field to make your subject stand out.”
“Then, keep your shutter speed fast enough (around 1/100s) to avoid blur from small movements. Finally, increase your ISO moderately (around 800-1600) to brighten the image without introducing too much noise.”
“On the other hand, when doing night street photography with moving cars and people, freezing motion becomes a priority. In this case, start by choosing a fast shutter speed (around 1/250s or faster) to capture sharp images of moving subjects. Open your aperture wide, but perhaps not as wide as for portraits — something like f/2.8 or f/4 — to keep more of the scene in focus. Then, raise your ISO higher (1600-3200 or more) to compensate for the faster shutter speed.”
Lizzie continues: “However, if you actually want to capture movement, like light trails from car headlights, you’ll need to slow your shutter speed right down. Something like 1 second or even longer can give you that beautiful motion blur effect. To avoid camera shake, use a tripod, as handholding the camera with such a slow shutter speed will blur the whole image.”
“Set a narrower aperture, like f/8 or f/11, to keep more of the scene sharp and help prevent overexposure. Then adjust your ISO, keeping it as low as possible (like ISO 100 or 200) to reduce noise since the long exposure time will already let in plenty of light.”
What are the best camera settings for portraits?
Lizzie says: “For portraits, you’ll most likely want to use a wide aperture (low f-number) to create a soft, blurry background that helps your subject stand out. Focus carefully on the eyes using single-point or area autofocus to ensure they’re sharp. And try to keep your ISO as low as possible to minimise noise, and adjust your white balance to maintain natural, accurate skin tones.”
What are the best camera settings for landscapes?
Lizzie says: “For beautiful landscape shots, start by using a narrow aperture (high f-number) to keep everything sharp from foreground to background.”
“If your scene has a lot of contrast between bright and dark areas, you might want to try bracketing — taking several photos at different exposures — to capture details in both the highlights and shadows that a single exposure might miss.”
“Keep your ISO low to reduce noise, and use a slow shutter speed if you want to show movement like flowing water. Lastly, if you’re not shooting in RAW, adjust your white balance so your colours come out accurate straight from the camera.”
What are the best camera settings for street photography?
“For street photography, I usually shoot in Aperture Priority at around f/8 with an ISO around 400,” explains Lizzie. “This helps keep most of the scene in focus — from the people you’re photographing to the surrounding environment.”
“The camera handles the shutter speed based on available light, which is handy when you’re moving quickly through the streets. I stick with single-shot autofocus to capture sharp portraits or moments, but if you’re in a busy city scene with lots of people moving fast, switching to continuous autofocus makes it easier to keep your subject sharp.”
“If you want to add some creativity with motion blur — like showing people walking past, cars, or bustling crowds — you can switch to Shutter Priority and try shutter speeds around 1/60 second or slower. Adjust the speed to control how much blur you get; it’s a great way to inject a sense of movement and energy into your street photography.”
Why should I shoot in RAW format?
Lizzie says: “Shooting in RAW lets you capture all the uncompressed data from your camera’s sensor, giving you maximum flexibility in post-processing. This means you can recover details in shadows and highlights, adjust exposure and white balance with greater precision, and make more creative edits — all without degrading image quality like you would with JPEG.”
Can I shoot the Northern Lights with my camera?
“Yes, you can definitely capture the Northern Lights with your camera, but it takes the right settings and preparation,” says Lizzie. “Start with a wide aperture — something like f/2.8 or wider — to let in as much light as possible. Use a high ISO, usually between 1600 and 3200, to help your sensor pick up the faint glow of the aurora.”
“Shutter speed is crucial here: you’ll want to use long exposures, typically between 5 and 25 seconds, depending on how bright and active the lights are. Too long, and the aurora will blur; too short, and you won’t capture enough detail. A sturdy tripod is essential to keep your camera perfectly still during long exposures.”
“Autofocus often struggles in the dark, so switch your lens to manual focus and set it to infinity. It’s also a good idea to shoot in RAW to retain as much detail as possible for editing later.”
Choosing a location with very low light pollution is imporant to get the best photography results. Read our Top UK Stargazing Spots Guide to capture the night sky.
Or, if you want to dive deeper into night sky photography, our Astrophotography Guide has everything you need to know to get started.
What makes a camera better for photography and video than just using a smartphone?
Lizzie explains: “The biggest difference usually comes down to sensor size. Dedicated cameras have much larger sensors than smartphones, which means they can capture more light and detail. This helps you get clearer, sharper images — especially in low light — and gives you more control over depth of field for that professional-looking background blur.”
“A larger sensor also means better dynamic range, so your photos retain more detail in bright and dark areas. Plus, with cameras, you get full manual control over settings like shutter speed, aperture, and ISO, letting you creatively shape your image and adapt to different lighting conditions in ways that smartphones simply can’t match.”
Another feature digital cameras offer over smartphones is the ability to take photos in RAW format. Unlike JPEGs, RAW files contain much more information about the scene. It means that areas of the shot that appeared over- or under-exposed may still be retrievable from a RAW file.
Level up your photography skills with Jessops
Now that you’ve got a solid grasp of your camera settings, it’s time to put your knowledge into practice. Our Jessops Academy Photography Courses and Experiences are perfect for helping you take those next steps.
Led by our team of photography experts, our courses range from Introduction to Photography for beginners to advanced workshops focused on specific styles and techniques, like our Wildlife Photography Experience Course.
Looking for more tailored support? Our 1-to-1 training sessions can help you unlock your camera’s potential, get editing support, or refresh your skills before your next shoot.
And of course, we’re here to support your kit needs too. At Jessops, you’ll find a wide range of digital cameras, lenses, photography accessories, and more to help you get the results you're after.
If you're new to photography, check out our Beginner’s Guide to Choosing the Best Digital Camera. Or for more advice and inspiration, head over to our blog for tips, how-tos and ideas to fuel your creativity.
Got questions or need a hand choosing the right gear? Contact us — our team is always happy to help.
Sign up for our latest news and offers
Receive the best offers right to your inbox by signing up to our newsletter
Thank You
