
What is ISO in Photography?
A guide for beginners

When it comes to snapping great photos, understanding your camera's settings is key. And ISO is one of these settings that play a crucial role in achieving the perfect shot, especially in tricky lighting conditions.
In this beginner's guide, we'll walk you through everything from what ISO is and why it matters to how to use it, with tips from Product Specialist Lizzie James at Jessops.
Contents
Why is ISO important for photography?
How do I know which ISO to use?
What is ISO?
In simple terms, ISO is a setting on your camera that can brighten or darken your images. Think of it as your camera's sensitivity to light – the higher the ISO number, the more sensitive your camera is to light.
For instance, a higher ISO can help capture clearer details in a dimly lit room by making the camera more receptive to available light.
What does ISO stand for?
ISO sensitivity is a standard set by the International Organization for Standardisation. So, ISO stands for International Organisation for Standardisation, an acronym that might seem a bit backwards at first glance.
The organisation chose ISO as a universal acronym to be easily recognised across different languages, avoiding any confusion that might come from language-specific variations. This way, ISO remains consistent and identifiable worldwide.
Why is ISO important for photography?
"ISO plays a crucial role in photography, allowing you to uphold image quality even when facing challenging lighting conditions," says Lizzie. "By adjusting the ISO setting while shooting, you can avoid photos that are too bright (overexposed) or too dark (underexposed)."
How to change ISO settings
How to change your ISO setting varies for different cameras. Here are the most common ways to do it:
Manual adjustment through camera menu – Most digital cameras have an ISO setting option within their menu system. Navigate using the camera's directional pad or touchscreen to find the ISO settings.
Dedicated ISO button – Some cameras, particularly DSLRs and higher-end models, feature a dedicated ISO button. This is usually located at the top of the camera, near the shutter release, on the back panel close to the LCD screen or next to the viewfinder. A quick tap on this button and you'll see the ISO options light up on your camera's display. From there, you can pick the level you need using the camera's command dial or the directional pad,
Customisable control dials – Advanced cameras often have control dials or wheels for adjusting ISO. This allows you to change the ISO quickly as you compose and shoot.
Automatic ISO settings – Many modern cameras offer an auto ISO function. This setting allows the camera to automatically adjust the ISO based on the lighting conditions it detects. This is particularly useful for beginners or in situations where lighting conditions change rapidly.
Before trying to adjust your ISO, ensure your camera is set to a mode that allows manual control, like Manual (M) or Aperture Priority (A/Av). Unless, of course, you're working in auto mode, where the camera takes care of ISO adjustments for you.
To learn more, read our guide on how to shoot in manual camera mode.
If you're not quite sure how to tweak the ISO settings on your camera, no worries – just grab your camera's manual. It will have the details you need, tailored to your specific model.
How do I know which ISO to use?
The right ISO setting is key to getting the best results in different lighting conditions. But different shooting situations call for different ISOs. Here are some instances when you might want to use a low, mid or high ISO, with example images.
When to use a low ISO
"In daytime photography with abundant natural light, a low ISO setting, such as ISO 100 or 200, is your best choice," explains Lizzie. "These settings ensure optimal image quality in bright conditions, where there's already plenty of available light."
The image on the right is taken in daylight using a low ISO (100).

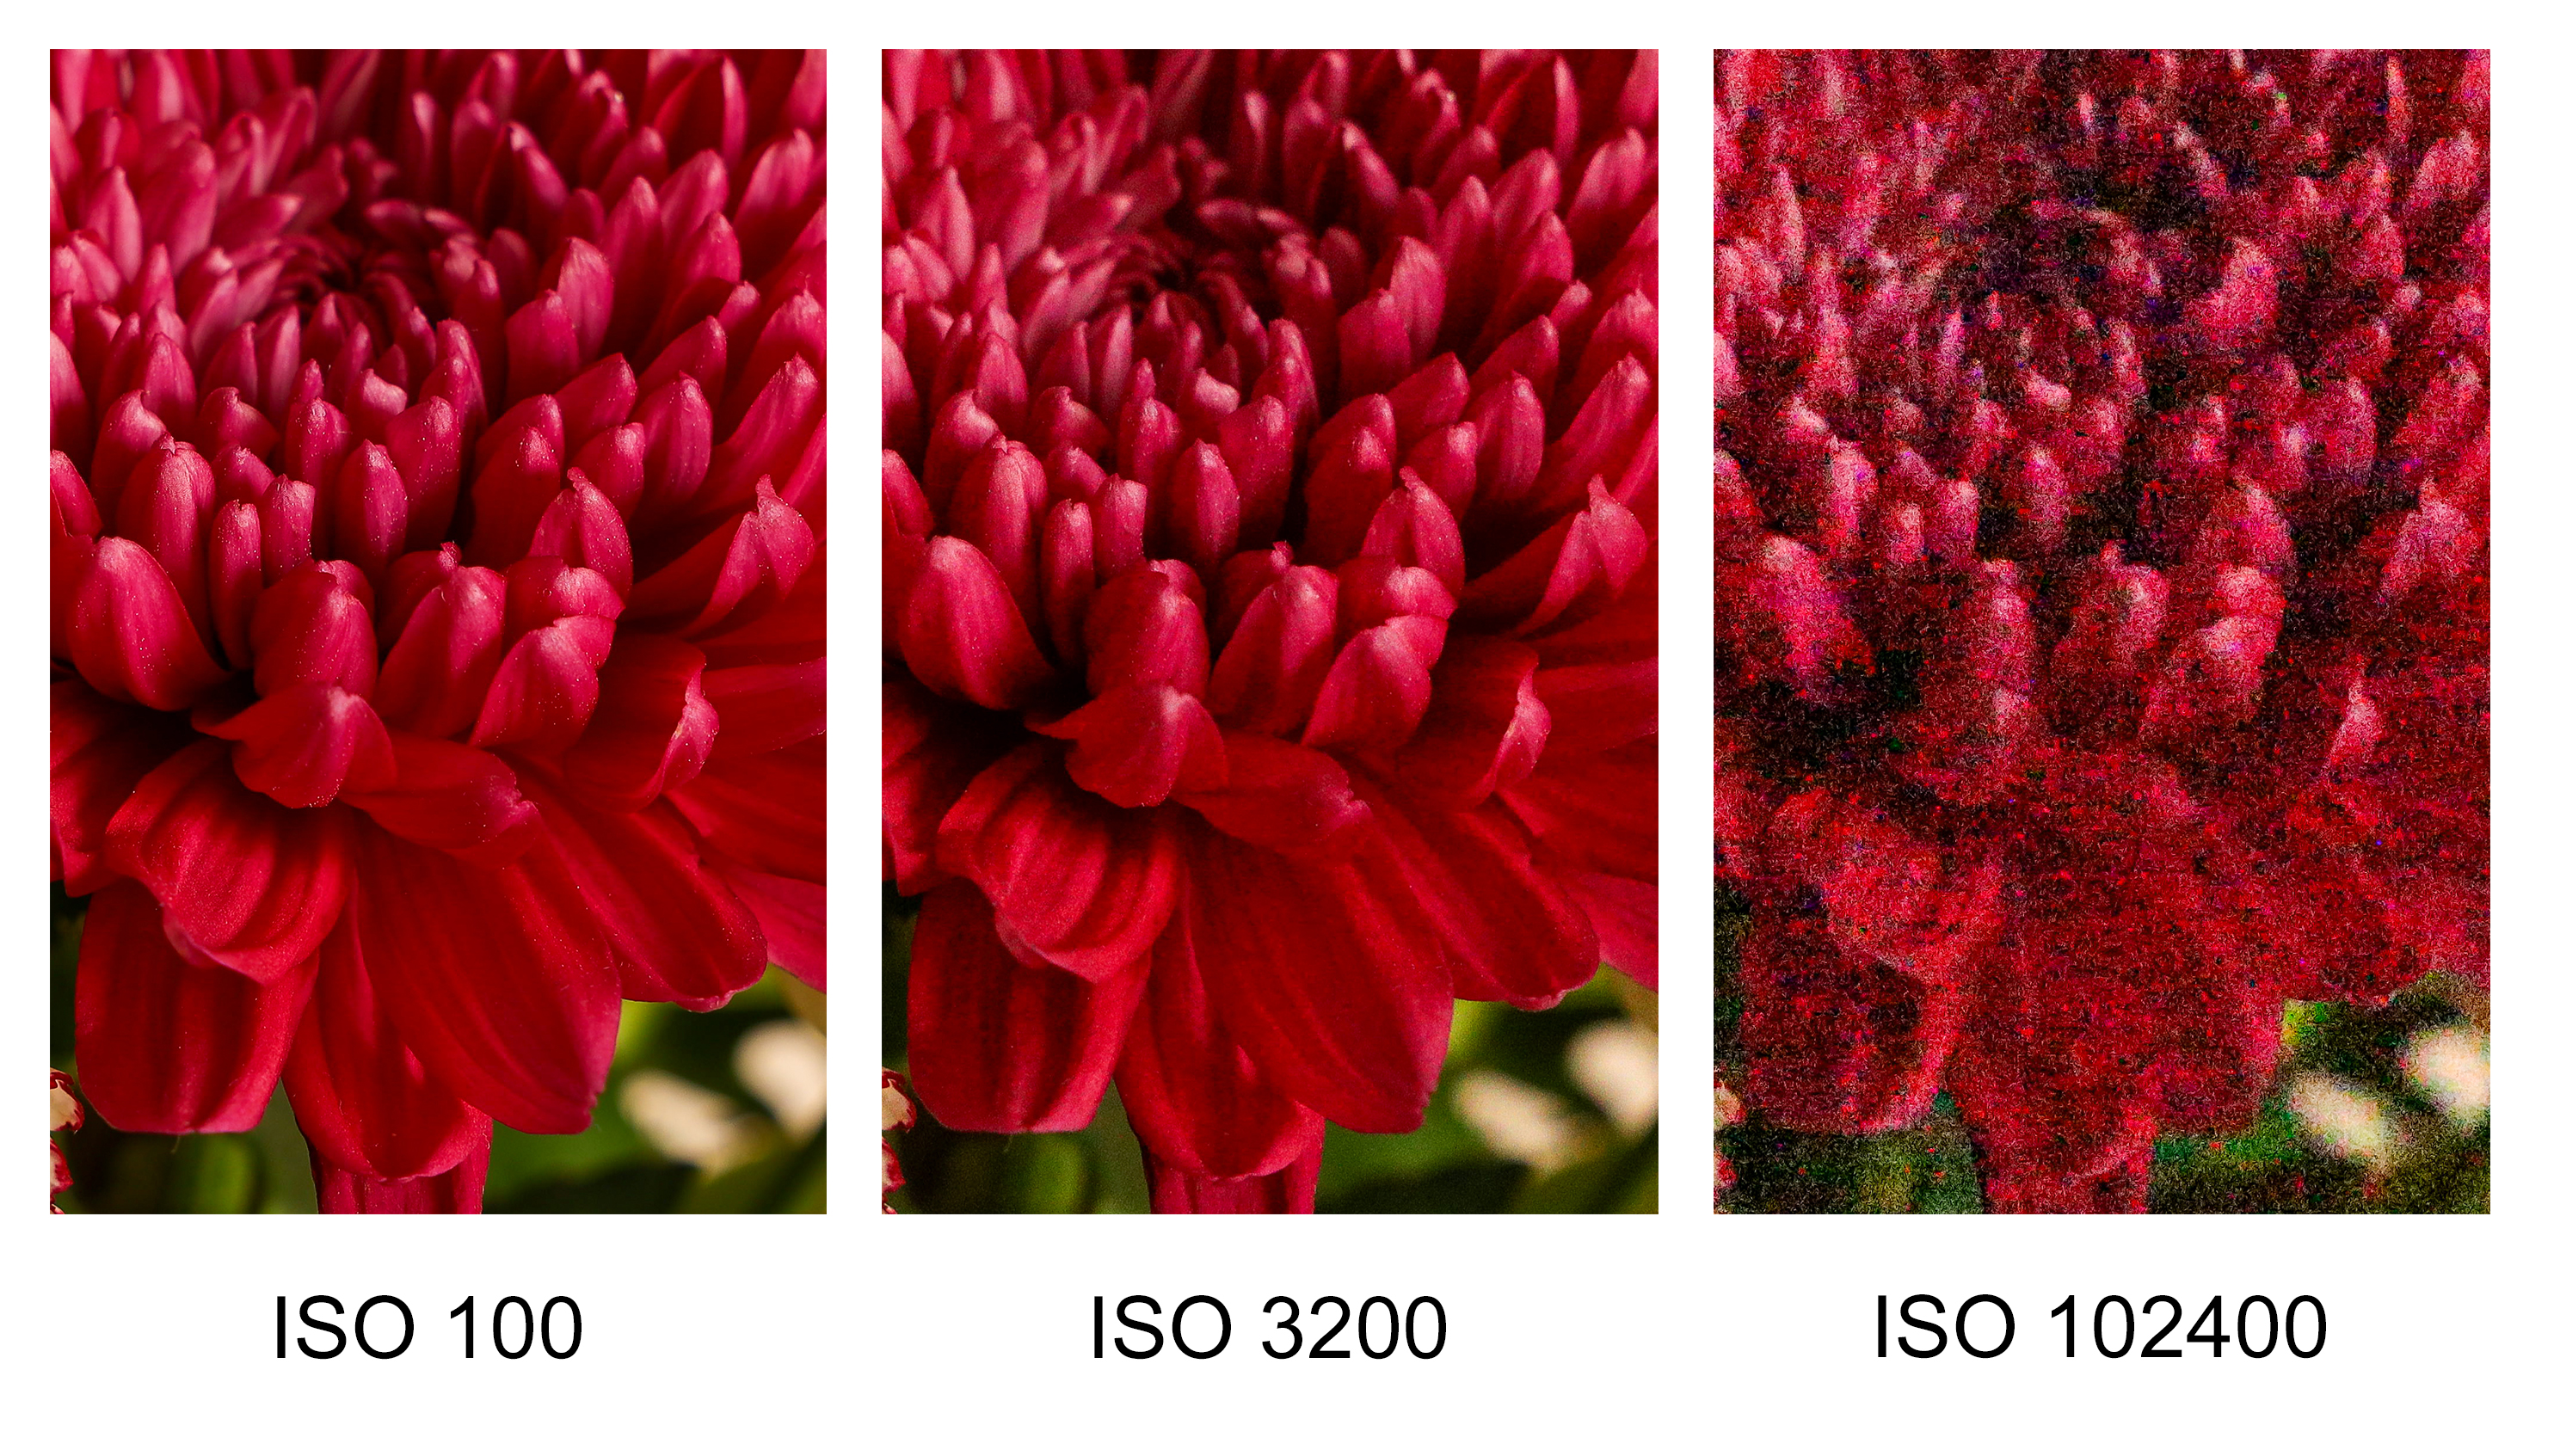
It's best to stick with a low ISO in natural lighting, unless the image conditions require differently. Here's an example of how using a high ISO when it's not needed can affect the quality of your final image. Notice the graininess as the ISO gets higher.
However, it’s not just daylight when a low ISO can come in handy. The nighttime example on the right uses a slow shutter speed to capture the movement of light in the fireworks. Since a longer shutter speed allows more light to enter the sensor, combining it with a low ISO of 50 ensured the image wasn’t overexposed.
The image on the right is taken with a low ISO (50) and long shutter speed.

When to use a mid ISO
A mid ISO, like 800 or 1600, can be beneficial when you're shooting indoors without an additional light source, like a flash, to maintain good image quality and capture clear details.
Here's another example where you might use a medium ISO:
In the image on thr right, a fast shutter speed was used to capture a squirrel moving quickly without any blurriness. Given the moderately lit environment and the fact that the fast shutter speed allowed less light to reach the sensor, an ISO setting of 1250 was selected to maintain proper exposure levels.
The image on the right was taken with a mid ISO (1250) and fast shutter speed.

When to use a high ISO
"In low-light conditions you'll need a higher ISO to allow your camera to capture more light," explains Lizzie. "This will ensure your photos are correctly exposed and well-lit."
Here’s another situation where you might use a high ISO setting:
The example on the right freezes quick dance movements with a fast shutter speed. However, a fast shutter speed provides less light, and the room was already dimly lit. Therefore, a higher ISO setting was necessary to compensate for this and brighten the image.
The image on the right is taken with a high ISO (16000) and faster shutter speed to capture fast movement.

What is the best ISO for night photography?
"For night photography, the best ISO setting typically ranges from 800 to 1600 or higher, depending on the available light," says Lizzie. "Higher ISO values will help your camera capture more light in low-light conditions, ensuring your photos are clear."
"Experiment with different ISO values within this range to find the sweet spot for your specific nighttime scene."
The Image on the right was taken with Nikon Z 30 Mirrorless Camera.

Photography tips for using ISO
Be mindful of noise with high ISO
"High ISO settings make your camera more sensitive to light, introducing an unwanted grainy effect known as noise, which can degrade image quality," explains Lizzie.
"To reduce noise, set your camera to a low ISO and try adding more light with either a wider aperture or slower shutter speed depending on the type of shot you are trying to capture."
Use low ISO when you can
"Low ISO settings provide exceptional clarity and minimal noise, making them ideal for capturing crisp details in brightly lit scenes," says Lizzie. "So, whenever you have plenty of natural light, make the most of it by keeping your ISO low for the best image quality."
Find the right balance between ISO, shutter speed and aperture
"When using ISO, keep in mind that it's just one part of the exposure triangle, along with shutter speed and aperture," says Lizzie. "To capture the best possible shots, you need to find a good balance among these settings."
"For example, let's say you're capturing a landscape, and you want everything in focus, from the foreground to the distant mountains."
"To achieve this, you should use a narrow aperture setting like f/16. However, because the narrow aperture restricts the amount of light entering your camera, your image sensor receives less light. Increasing the ISO setting becomes essential to compensate for the reduced light and ensure your photo maintains proper exposure."
"Another scenario is shooting an indoor sporting event and needing a fast shutter speed to freeze the action. This fast shutter speed limits the amount of light entering the camera, so you'd also need to raise the ISO for the perfect shot."
Practice makes perfect
"Don't be afraid to play around with ISO settings in various lighting conditions," explains Lizzie. "Taking test shots to understand how different ISO values impact your photos will boost your confidence in photography and help you improve your overall skills."
Improve your photography skills with Jessops
At Jessops, we have a wide range of cameras and accessories from leading brands like Sony, Canon, Fujifilm and Nikon.
If you're new to photography, check out our beginner's guide to choosing the best digital camera. Or, for more valuable advice and inspiration, take a look at our blog.
If you have any questions or are uncertain about which product best suits your needs, contact us today.
Sign up for our latest news and offers
Receive the best offers right to your inbox by signing up to our newsletter
Thank You
